Introduction
In database-driven applications, every query counts. When the same data is retrieved repeatedly from the database, those individual read operations may only take milliseconds, but under high load, those milliseconds can quickly accumulate and become a performance bottleneck.
A common solution to mitigate this is caching: storing frequently accessed data in faster storage layers to avoid repeated database queries.
In this post, we'll explore how to implement this using Kotlin with Spring, a well-established backend framework for JVM languages. Spring's powerful cache abstraction makes implementing caching remarkably simple.
The main challenge: choosing the right caching strategy. Should we use in-memory caching for speed? Distributed caching for scalability? Why not both?
Let's start simple.
Annotation Wonders

Spring provides a simple, declarative approach to caching based on annotations.
Consider an admin management application that utilises a UserService to retrieve user data from a database. Typical usage patterns include repeatedly querying data for the same users - such as user profile views, authentication checks, permission validations - making this service a great candidate for caching.
@Service
class UserService(private val userRepository: UserRepository) {
    fun getUserById(id: Long): User? {
        return userRepository.findById(id)
    }

    // remaining CRUD operations - ommitted for brevity
}
We just need one annotation, and we can have that method wrapped with caching capabilities!
While at it let's complete the example with the remaining CRUD methods and introduce all main Spring cache annotations.
@Service
class UserService(private val userRepository: UserRepository) {

    companion object {
        private const val USERS_CACHE = "users"
    }

    @Cacheable(value = [USERS_CACHE], key = "#id")
    fun getUserById(id: Long): User? {
        return userRepository.findById(id)
    }

    @CachePut(value = [USERS_CACHE], key = "#result.id")
    fun createUser(username: String, email: String, fullName: String): User {
        return userRepository.create(username, email, fullName)
    }

    @CachePut(value = [USERS_CACHE], key = "#id")
    fun updateUser(id: Long, username: String, email: String, fullName: String): User? {
        return userRepository.update(id, username, email, fullName)
    }

    @CacheEvict(value = [USERS_CACHE], key = "#id")
    fun deleteUser(id: Long): Boolean {
        return userRepository.delete(id)
    }

}
That's it! No manual cache operations. Spring handles everything:
- @Cacheable: Check cache before executing method; if hit, return cached value
- @CachePut: Always execute method AND update cache with result
- @CacheEvict: Remove entry from cache
Notice how we didn't even specify the caching provider - the underlying implementation that actually manages cached data (like Redis, Caffeine, or Hazelcast) - as the annotations abstract away the implementation entirely. Our service simply declares what to cache, not how to cache it.
That's all delegated to configuration, as we'll see below.
Configuring the Cache Provider
First, we'll create a @Configuration class and add @EnableCaching to register it with Spring as a reference for annotation-driven cache management.
Then, we start getting into the specifics of the actual cache provider and its configurations.
Here enters the CacheManager. By defining a producer method for the CacheManager type, we tell Spring to create and manage this instance, automatically wiring it into the caching infrastructure that powers our annotations.
Let's use Redis for this example, a typical candidate for a cache provider that allows distributed data access and persistence:
@Configuration
@EnableCaching
class CacheConfiguration {

    @Bean
    fun cacheManager(redisConnectionFactory: RedisConnectionFactory): CacheManager {
        val cacheConfig = RedisCacheConfiguration.defaultCacheConfig()
            .entryTtl(Duration.ofMinutes(10))
            .disableCachingNullValues()

        return RedisCacheManager.builder(redisConnectionFactory)
            .cacheDefaults(cacheConfig)
            .build()
    }
}
The Power of Abstraction
If for some reason we need to stop using Redis or find a better alternative, changing is trivial. Spring's cache abstraction means we can swap providers without touching the business logic.
Want to try Hazelcast instead of Redis?
@Bean
fun cacheManager(): CacheManager {
    return HazelcastCacheManager(hazelcastInstance())
}
By simply changing one bean definition, the entire application now uses Hazelcast, and our service layer remains unchanged.
What if we actually want to have both, perhaps even compare performances?
First we'll keep both CacheManager providers in the configuration.
@Configuration
@EnableCaching
class CacheConfiguration {

    @Bean
    @Primary
    fun redisCacheManager(redisConnectionFactory: RedisConnectionFactory): CacheManager {
        val cacheConfig = RedisCacheConfiguration.defaultCacheConfig()
            .entryTtl(Duration.ofMinutes(10))
            .disableCachingNullValues()

        return RedisCacheManager.builder(redisConnectionFactory)
            .cacheDefaults(cacheConfig)
            .build()
    }

    @Bean
    fun hazelcastCacheManager(): CacheManager {
        return HazelcastCacheManager(hazelcastInstance())
    }
}
Then, let’s add an alternative get method to our UserService for the sake of this example. All we have to do is use the same @Cacheable annotation, only this time we’ll specify the cacheManager argument.
@Service
class UserService(private val userRepository: UserRepository) {

    companion object {
        private const val USERS_CACHE = "users"
    }

    @Cacheable(value = [USERS_CACHE], key = "#id")
    fun getUserById(id: Long): User? {
        return userRepository.findById(id)
    }

    @Cacheable(value = [USERS_CACHE], key = "#id", cacheManager = "hazelcastCacheManager")
    fun getUserByIdV2(id: Long): User? {
        return userRepository.findById(id)
    }

    ...
}
We don't actually have to change anything in the original getUserById annotation. In this case, we want to keep using the Redis but specifying the cacheManager is not required. This is because in the last CacheConfiguration snippet we sneaked in a detail: we also annotated redisCacheManager with @Primary and can now use that as the default provider.
This flexibility also opens the door to something else: multi-tier caching.
Evolving to Multi-Tier Caching
Sticking with the first example provider, Redis is great, but it still requires network calls - especially in distributed deployments with multiple app instances. For ultra-hot data accessed thousands of times per second, even fast database calls on the order of tens of milliseconds add up.
In contrast, in-memory caches are much faster, but they come with some limitations:
- Memory bloat: Large caches consume significant RAM
- No distribution: Different app instances won't share a common cache
- Inconsistency: Updates on one app instance don't invalidate other instances' caches
So why not combine them to have the best of both worlds?
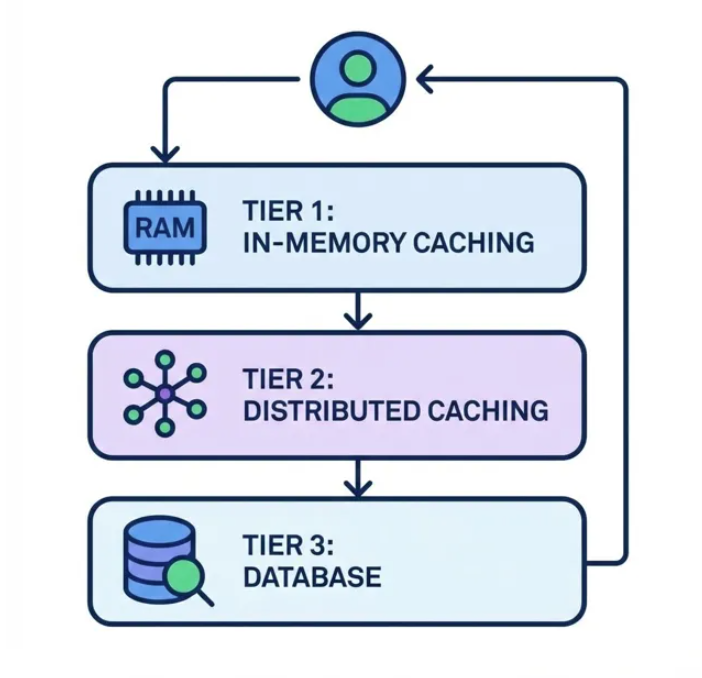
The Two-Tier Architecture
Let's create an example where we use Caffeine as the in-memory caching implementation integrated with Spring's cache framework.
How it works:
- Layer 1 (L1) - In-Memory (Caffeine):
- Serves ‘hot’ data with low latency
- Small size limit and TTL prevents memory bloat
- Layer 2 (L2) - Distributed standalone (Redis):
- Serves ‘warm’ data with lower latency than actual database queries
- Shared across app instances
- Significant TTL reduces database load
- Database: Source of truth, only queried on cache misses
Implementing Two-Tier Caching
Introducing the @Caching annotation, it lets us declare multiple cache providers wrapping the same database request. When data is requested, Spring will check the caches in order of appearance before attempting an actual query to the database:
- Check Caffeine (L1)
- If miss, check Redis (L2)
- If miss, execute method and populate both
Let's build this with our UserService:
@Service
class UserService(private val userRepository: UserRepository) {

    companion object {
        private const val USERS_CACHE = "users"
    }

    @Caching(cacheable = [
        Cacheable(value = [USERS_CACHE], key = "#id", cacheManager = "caffeineCacheManager"),
        Cacheable(value = [USERS_CACHE], key = "#id", cacheManager = "redisCacheManager")
    ])
    fun getUserById(id: Long): User? {
        return userRepository.findById(id)
    }

    @Caching(put = [
        CachePut(value = [USERS_CACHE], key = "#result.id", cacheManager = "caffeineCacheManager"),
        CachePut(value = [USERS_CACHE], key = "#result.id", cacheManager = "redisCacheManager")
    ])
    fun createUser(username: String, email: String, fullName: String): User {
        return userRepository.create(username, email, fullName)
    }

    @Caching(put = [
        CachePut(value = [USERS_CACHE], key = "#id", cacheManager = "caffeineCacheManager"),
        CachePut(value = [USERS_CACHE], key = "#id", cacheManager = "redisCacheManager")
    ])
    fun updateUser(id: Long, username: String, email: String, fullName: String): User? {
        return userRepository.update(id, username, email, fullName)
    }

    @Caching(evict = [
        CacheEvict(value = [USERS_CACHE], key = "#id", cacheManager = "caffeineCacheManager"),
        CacheEvict(value = [USERS_CACHE], key = "#id", cacheManager = "redisCacheManager")
    ])
    fun deleteUser(id: Long): Boolean {
        return userRepository.delete(id)
    }
}
The Missing Piece: Cache Promotion Between Layers
There's one problem with the current setup: when a cache entry expires in-memory in Layer 1 but the Layer 2 cache still has the data, we'll be left without L1 caching until L2 expires as well.
To address this, when a L1 cache miss triggers an L2 cache hit, we want to repopulate L1 with the result. This is known as cache promotion.
Since Spring doesn't do this automatically, we need a custom CacheInterceptor:
class CacheInterceptor(
    private val caffeineCacheManager: CacheManager
) : CacheInterceptor() {

    override fun doGet(cache: Cache, key: Any): Cache.ValueWrapper? {
        val cacheValue = super.doGet(cache, key)

        // If we got a hit from Redis cache, promote it to Caffeine
        if (cacheValue != null && cache is RedisCache) {
            val caffeineCache = caffeineCacheManager.getCache(cache.name)
            caffeineCache?.putIfAbsent(key, cacheValue.get())
        }

        return cacheValue
    }
}
And register it in our configuration:
@Configuration
@EnableCaching
class CacheConfiguration {

    ...

    @Bean
    fun cacheInterceptor(
        caffeineCacheManager: CacheManager,
        cacheOperationSource: CacheOperationSource
    ): CacheInterceptor {
        val interceptor = DemoCacheInterceptor(caffeineCacheManager)
        interceptor.setCacheOperationSources(cacheOperationSource)
        return interceptor

    }

    @Bean
    fun cacheOperationSource(): CacheOperationSource {
        return AnnotationCacheOperationSource()
    }
}
Now when Redis has data but Caffeine doesn't, the interceptor automatically promotes it up to L1 for faster subsequent access.
Conclusion
Spring's cache abstraction transforms caching from a complex infrastructure concern into a simple, declarative feature. As illustrated throughout this post, starting with distributed caching and evolving into a two-tier approach becomes seamless, enabling the system to meet high-traffic performance demands without compromising code simplicity.
The key is flexibility: Spring's abstraction lets you start simple and evolve your caching strategy as your needs grow, all without rewriting your business logic.